
Claude Desktop Integration
Learn how to integrate your 1MCP server with Claude Desktop using two different approaches: local configuration consolidation (recommended for simplicity) and remote custom connectors (for advanced use cases).
Integration Approaches
1. Local Configuration Consolidation (Recommended)
The simplest approach is to consolidate your existing MCP servers into Claude Desktop's configuration using 1MCP as a local proxy. This approach:
- Uses 1MCP proxy to bridge STDIO and HTTP transports
- Automatically configures Claude Desktop to use 1MCP proxy
- Preserves your existing MCP server configurations
- Enables server filtering via global presets
- Works with a running 1MCP HTTP server in the background
2. Remote Custom Connectors (Advanced)
For advanced scenarios, you can connect to a remote 1MCP server using Claude Desktop's custom connector feature with HTTP or SSE transport. This approach:
- Requires public HTTPS URL (tunneling/reverse proxy)
- Supports OAuth authentication
- Enables remote access to centralized 1MCP servers
- Useful for team/enterprise deployments
Why Use 1MCP with Claude Desktop?
- Unified Access: Access multiple MCP servers through one endpoint
- Server Filtering: Use presets to control which servers are available
- Centralized Management: Manage all MCP servers in one place
- Hot Reloading: Add/remove servers without restarting Claude Desktop
- Preset Switching: Easily switch between different server configurations
Quick paths
Choose your approach
- Local (Recommended): 1MCP proxy bridges STDIO↔HTTP with preset-based filtering
- Remote (Advanced): Expose 1MCP over HTTPS and add a custom connector
Local setup (Recommended)
The local approach uses a two-component setup: a running 1MCP HTTP server and a proxy that bridges to Claude Desktop's STDIO transport.
# 1. Optionally add some servers first (with tags for filtering)
npx -y @1mcp/agent mcp add context7 --tags=documentation,docs -- npx -y @upstash/context7-mcp
npx -y @1mcp/agent mcp add sequential --tags=thinking,analysis -- npx -y @modelcontextprotocol/server-sequential-thinking

# 2. Create a preset for filtered server access (recommended)
npx -y @1mcp/agent preset create claude-desktop --filter "documentation OR thinking"

# 3. Start 1MCP HTTP server in background
npx -y @1mcp/agent serve &

# 4. Consolidate Claude Desktop to use 1MCP proxy
npx -y @1mcp/agent app consolidate claude-desktop --dry-run  # Preview
npx -y @1mcp/agent app consolidate claude-desktopThen restart Claude Desktop. Backups are created automatically; restore anytime:
npx -y @1mcp/agent app backups claude-desktop
npx -y @1mcp/agent app restore claude-desktopGlobal Preset Configuration
For server filtering, the proxy command uses global presets. You can specify which preset to use when configuring Claude Desktop:
# Test with a specific preset
npx -y @1mcp/agent proxy --preset claude-desktopThis enables global server filtering that applies to all Claude Desktop conversations.
Remote custom connector (Advanced)
- Start server
npx -y @1mcp/agent serve --transport http --port 3001 --external-url https://your-domain.com # dev
npx -y @1mcp/agent serve --transport http --port 3001 --enable-auth --external-url https://your-domain.com # prodServed paths: /mcp (Streamable HTTP), /sse + /messages (SSE), /oauth (OAuth), /health (health).
- Expose server over HTTPS
- ngrok:
ngrok http 3001→ usehttps://<id>.ngrok-free.app/mcp - Reverse proxy:
- nginx: proxy
location /→http://localhost:3001(HTTP/1.1, buffering off) - Caddy:
reverse_proxy localhost:3001 - Traefik: router for host → service
1mcpon port 3001
- nginx: proxy
- Add connector in Claude Desktop
- Name: any (e.g., "1mcp")
- URL: your public
https://.../mcp - Optional: OAuth Client ID/Secret
Note: OAuth 2.1 validates the issuer URL. Always set
--external-urlto your public origin (for example,https://your-domain.comorhttps://abc123.ngrok-free.app).
- Use HTTPS
- Do not include a path (no
/mcp)- Match exactly what Claude Desktop uses
Step 2: Add Custom Connector in Claude Desktop
Open Claude Desktop Settings
- Click on your profile/settings in Claude Desktop
- Navigate to "Connectors" or look for connector management
Add Custom Connector
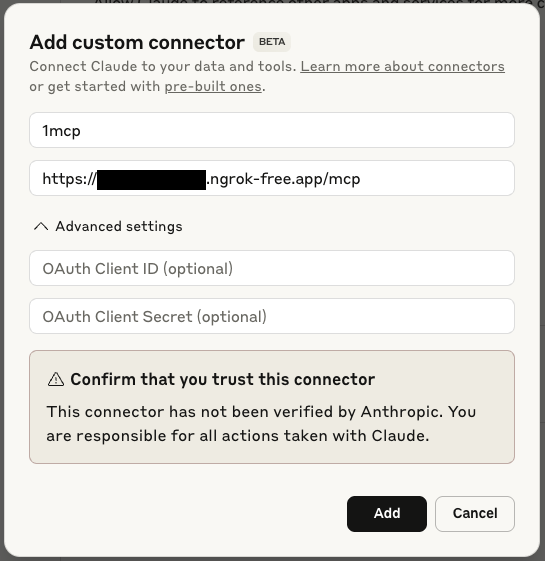
- Click "Add custom connector"
- You'll see a dialog like this:
Enter Connection Details
- Name: Enter a name for your connector (e.g., "1mcp")
- URL: Enter your public HTTPS URL:
- With ngrok:
https://abc123.ngrok-free.app/mcp - With reverse proxy:
https://your-domain.com/mcp
- With ngrok:
- OAuth Client ID (optional): If using authentication
- OAuth Client Secret (optional): If using authentication
Confirm Trust
- Review the security warning
- Click "Add" to confirm you trust this connector
Step 3: Verify Connection
After adding the connector, you should see your 1MCP tools available:
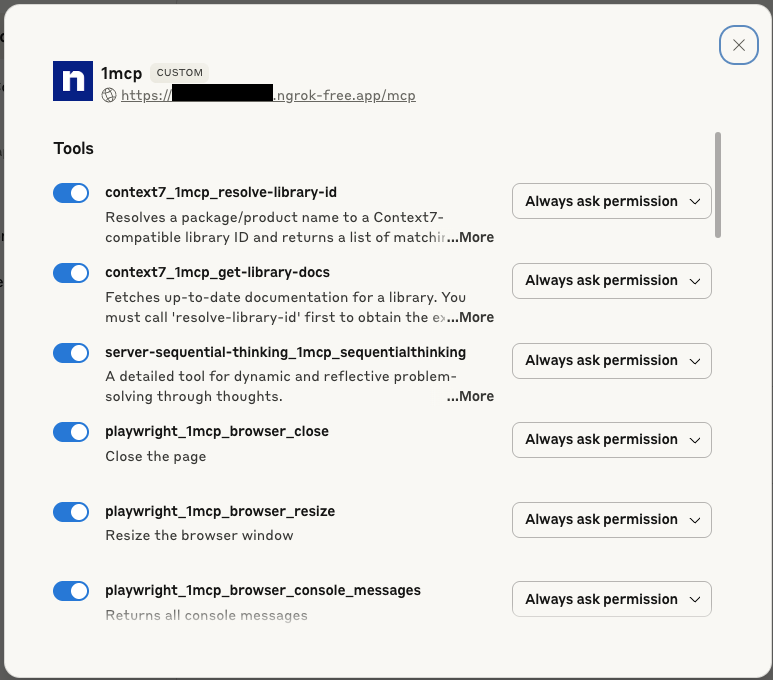
The tools shown will depend on which MCP servers you have configured in your 1MCP instance. Common tools include:
- Context7 library documentation tools
- Sequential thinking tools
- Playwright browser automation
- And any other MCP servers you've added
Step 4: Use Your Tools
Once connected, your 1MCP tools will appear in Claude Desktop's interface:
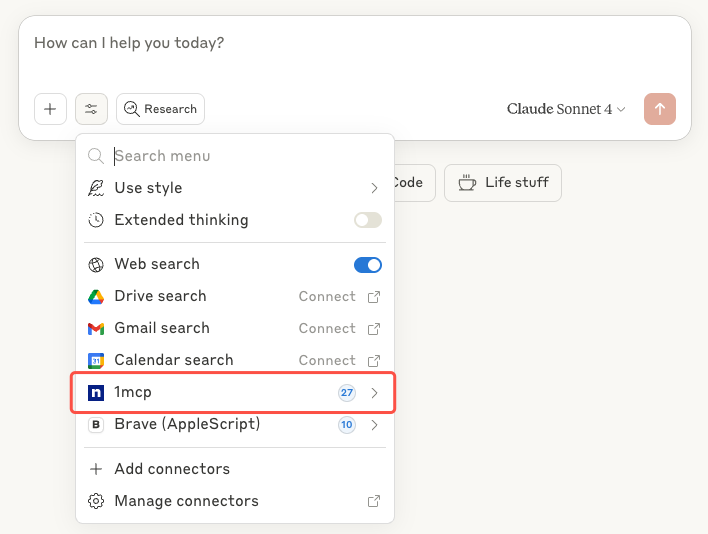
You can now use these tools directly in your conversations with Claude.
💡 Tip: If any service shows "Awaiting OAuth", open your server's OAuth dashboard at
https://your-domain.com/oauthand click Authorize for that service. Then retry in Claude Desktop.
Server quick config
# Start
npx -y @1mcp/agent serve --transport http --port 3001 --external-url https://your-domain.com

# Enable auth (recommended for production)
npx -y @1mcp/agent serve --transport http --port 3001 --enable-auth --external-url https://your-domain.com

# Filter exposed servers
npx -y @1mcp/agent serve --transport http --port 3001 --filter "context7,sequential" --external-url https://your-domain.com

# Bind to all interfaces (behind reverse proxy)
npx -y @1mcp/agent serve --transport http --port 3001 --host 0.0.0.0 --external-url https://your-domain.comAuthentication
- Enable:
npx -y @1mcp/agent serve --transport http --port 3001 --enable-auth - Configure Client ID/Secret in Claude Desktop if needed; OAuth flow is automatic
Troubleshooting
Local Configuration Issues
Tools Not Appearing After Consolidation
Symptoms: Consolidation completes but tools don't appear in Claude Desktop.
Solutions:
Restart Claude Desktop: Ensure you've completely restarted Claude Desktop after consolidation
Check Configuration: Verify the consolidation worked correctly
bash# Check the generated configuration cat "~/Library/Application Support/Claude/claude_desktop_config.json"Test 1MCP Components: Verify both HTTP server and proxy are working correctly
bash# Check server status npx -y @1mcp/agent mcp status # Start HTTP server (if not running) npx -y @1mcp/agent serve & # Test proxy command in another terminal npx -y @1mcp/agent proxy --log-level=debug
"Consolidation Failed" Error
Symptoms: The consolidation command fails with errors.
Solutions:
Use Force Flag: Skip connectivity validation
bashnpx -y @1mcp/agent app consolidate claude-desktop --forceCheck Permissions: Ensure write access to Claude Desktop's config directory
bashls -la "~/Library/Application Support/Claude/"Manual Cleanup: If consolidation is partially complete
bash# Restore from backup npx -y @1mcp/agent app restore claude-desktop # Or manually reset npx -y @1mcp/agent app consolidate claude-desktop --force
"Configuration Backup Failed" Error
Symptoms: Unable to create backup of existing configuration.
Solutions:
- Check Disk Space: Ensure sufficient disk space
- Check Permissions: Verify write access to backup directory
- Use Force Mode: Proceed without backup (use with caution)bash
npx -y @1mcp/agent app consolidate claude-desktop --force --backup-only
Proxy Connection Issues
Symptoms: Claude Desktop shows connection errors or tools don't appear after consolidation.
Solutions:
Verify HTTP Server is Running: The proxy needs a running 1MCP HTTP server
bash# Check if server is running curl http://localhost:3050/health # Start server if not running npx -y @1mcp/agent serve &Test Proxy Command Directly: Verify proxy can connect to the server
bash# Test proxy with debug logging npx -y @1mcp/agent proxy --log-level=debugVerify Preset and Tags: Ensure servers have tags that match preset filters
bash# List servers with their tags npx -y @1mcp/agent mcp list # Check which servers are included in preset npx -y @1mcp/agent preset show claude-desktopTest Proxy with Preset: Verify proxy works with the specified preset
bash# Test proxy with the preset used in Claude Desktop npx -y @1mcp/agent proxy --preset claude-desktop --log-level=debug
Server Discovery Issues
Symptoms: Proxy cannot find the running 1MCP HTTP server.
Solutions:
Check Common Ports: Proxy scans ports 3050, 3051, 3052 by default
bash# See what's running on common ports netstat -an | grep -E ':(3050|3051|3052)'Specify Server URL Manually: Override auto-discovery
bash# Test proxy with specific server URL npx -y @1mcp/agent proxy --url http://localhost:3050/mcpCheck Firewalls: Ensure local firewall isn't blocking connections
Remote Custom Connector Issues
"Failed to Connect" Error
Symptoms: Claude Desktop shows connection failed when adding the connector.
Solutions:
Check Server Status: Ensure your 1MCP server is running
bashnpx -y @1mcp/agent mcp status # Check if servers are runningVerify URL: Ensure the URL is correct and accessible
bash# Health endpoints are served at /health (not under /mcp) curl https://your-domain.com/health # Test basic connectivityCheck Firewall: Ensure the port is open and accessible
Tools Not Appearing
Symptoms: Connector connects but no tools are visible.
Solutions:
Check Server Configuration: Verify MCP servers are properly configured
bashnpx -y @1mcp/agent mcp list # List configured serversRestart Both: Restart both 1MCP and Claude Desktop
Authentication Issues
Symptoms: OAuth authentication fails or keeps asking for credentials.
Solutions:
- Check OAuth Configuration: Ensure OAuth is enabled in 1MCP
- Issuer match: Set
--external-urlto your public HTTPS origin (no path) and ensure it matches Claude’s connector URL origin exactly - Verify Credentials: Double-check Client ID and Secret in Claude Desktop
- Clear Cache: Try removing and re-adding the connector
Debugging Steps
Test Direct Connection:
bash# Test your exposed HTTPS endpoint curl -X POST https://your-domain.com/mcp \ -H "Content-Type: application/json" \ -d '{"jsonrpc": "2.0","id": 1,"method": "initialize","params": {"protocolVersion": "2025-06-18","capabilities": {},"clientInfo": {"name": "ExampleClient","title": "Example Client Display Name","version": "1.0.0"}}}'Check Server Logs:
bashONE_MCP_LOG_LEVEL=debug npx -y @1mcp/agent serve --transport http --port 3001Health Check:
bash# Check if server is responding through your proxy/tunnel curl https://your-domain.com/health
Security Considerations
Production Deployment
- HTTPS via reverse proxy (nginx/Caddy/Traefik)
- Enable OAuth in production:
--enable-auth - Harden network: firewall, VPN/private networks, rate limiting at proxy, bind to localhost when proxied
Trust and Permissions
- Review Carefully: Only connect to trusted 1MCP servers
- Understand Permissions: Review what tools will be accessible
- Regular Audits: Periodically review connected connectors and their permissions
Advanced Usage
Multiple Environments
You can add multiple 1MCP connectors for different environments:
Development Environment:
- Name: "1MCP Dev"
- URL:
https://dev-abc123.ngrok-free.app/mcp(using ngrok)
Production Environment:
- Name: "1MCP Prod"
- URL:
https://prod-server.com/mcp - OAuth credentials for production
Server Filtering
Control which tools are available by filtering servers:
# Only expose specific capabilities
npx -y @1mcp/agent serve --transport http --port 3001 --filter "context7,sequential"Best Practices
Local
- Start HTTP server first →
serve(uses default port 3050) - Create presets for server filtering →
preset create - Use
--presetparameter in proxy command for filtering - Preview consolidation →
--dry-run - Backups are automatic; restart Claude Desktop after consolidation
- Keep agent updated; monitor with
mcp status
Remote
- Start simple (no auth), then add OAuth + HTTPS for prod
- Health checks + monitoring
- Review permissions regularly; keep servers updated
Examples
Local (recommended)
# 1. Install 1MCP agent
npm install -g @1mcp/agent

# 2. Add some useful MCP servers (with tags for filtering)
npx -y @1mcp/agent mcp add context7 --tags=documentation,docs -- npx -y @upstash/context7-mcp
npx -y @1mcp/agent mcp add sequential --tags=thinking,analysis -- npx -y @modelcontextprotocol/server-sequential-thinking
npx -y @1mcp/agent mcp add playwright --tags=browser,testing -- npx -y @playwright/mcp

# 3. Create a preset for Claude Desktop
npx -y @1mcp/agent preset create claude-desktop --filter "documentation OR thinking OR browser"

# 4. Start 1MCP HTTP server
npx -y @1mcp/agent serve

# 5. In another terminal, preview consolidation
npx -y @1mcp/agent app consolidate claude-desktop --dry-run

# 6. Consolidate Claude Desktop configuration
npx -y @1mcp/agent app consolidate claude-desktop

# 7. Restart Claude Desktop

# 8. Verify tools are available in Claude Desktop
npx -y @1mcp/agent mcp status # Check server healthYour Claude Desktop will now use the following configuration automatically:
{
  "mcpServers": {
    "1mcp": {
      "command": "npx",
      "args": ["-y", "@1mcp/agent", "proxy", "--preset", "claude-desktop"]
    }
  }
}With Custom Presets
You can specify any preset when configuring Claude Desktop:
{
  "mcpServers": {
    "1mcp": {
      "command": "npx",
      "args": ["-y", "@1mcp/agent", "proxy", "--preset", "my-custom-preset"]
    }
  }
}Create different presets for different use cases:
# Development preset
npx -y @1mcp/agent preset create dev --filter "filesystem OR git OR testing"

# Documentation preset
npx -y @1mcp/agent preset create docs --filter "documentation OR writing"

# Analysis preset
npx -y @1mcp/agent preset create analysis --filter "data OR thinking"Remote + ngrok
For development setups where you need remote access:
# 1. Install and configure 1MCP
npm install -g @1mcp/agent
npx -y @1mcp/agent mcp add context7 -- npx -y @upstash/context7-mcp
npx -y @1mcp/agent mcp add sequential -- npx -y @modelcontextprotocol/server-sequential-thinking

# 2. Expose via ngrok
ngrok http 3001

# 3. Start server, use the URL from ngrok
npx -y @1mcp/agent serve --transport http --port 3001 --external-url https://abc123.ngrok-free.app

# 4. Add connector in Claude Desktop:
#    - Name: "My 1MCP Server"
#    - URL: "https://abc123.ngrok-free.app/mcp" (use the URL from ngrok)

# 5. Verify tools are available in Claude DesktopProduction + Nginx
# 1. Start 1MCP server (bind to localhost for security)
npx -y @1mcp/agent serve --transport http --port 3001 --enable-auth --external-url https://your-domain.com

# 2. Configure nginx to proxy HTTPS to HTTP
# 3. Add connector in Claude Desktop:
#    - Name: "Production 1MCP"
#    - URL: "https://your-domain.com/mcp"
#    - Add OAuth credentials

# 4. Verify tools are available in Claude DesktopGetting Help
If you encounter issues:
- Check the troubleshooting section above
- For local configuration issues:
- Try
npx -y @1mcp/agent app consolidate claude-desktop --force - Check
npx -y @1mcp/agent mcp statusfor server health - Use
npx -y @1mcp/agent app restore claude-desktopto rollback
- Try
- For remote connector issues:
- Review Anthropic's documentation on:
- Open an issue on our GitHub repository
- Check the 1MCP documentation for server configuration help
Which Approach Should I Use?
Choose Local Configuration Consolidation if:
- ✅ You want preset-based server filtering
- ✅ You're using Claude Desktop on your local machine
- ✅ You don't need remote access
- ✅ You want centralized server management
- ✅ You prefer running HTTP server with proxy bridge to Claude Desktop
Choose Remote Custom Connectors if:
- ✅ You have a Claude Pro/Max/Team/Enterprise plan
- ✅ You need to access a centralized 1MCP server
- ✅ You're comfortable with networking/HTTPS setup
- ✅ You want to share MCP servers across multiple clients
- ✅ You need OAuth authentication
Next Steps
- Learn about the Proxy Command for detailed configuration options
- Explore server filtering options for presets and tags
- Set up server management for your MCP servers
- Configure app consolidation for seamless management of other apps
- Learn about authentication configuration for remote setups